Showing posts with label main dish. Show all posts

Saturday, January 13, 2018

cooking light, cooking right ~ pork tenderloin and collards skillet


I do not like the word "luck."  I haven't for a long time.  Like, since I was in high school, long.  It was then that I started really noticing how much people lean on "luck" and "coincidence" to describe unexplainable line-ups in life, and I started thinking about what it would be like if I chose to believe such happenings were a God thing.  Big or small.  From a prime parking place when in a major time crunch, to a most applicable, poignant Bible verse when in the middle of a crisis.  

Beginning to see things from that viewpoint changed me, and it gave me this sense of God's closeness in a more consistent way.  I began seeing Him more and more as an active part of my everyday, rather than viewing Him as this big, untouchable being.  And, as a believer, I felt much more comfortable with the idea that purpose drove my daily ins and outs versus a big helping of chance.      

Not being superstitious in any way, this still kicked off our new year with a marvelous start!  It was a great, tasty spin on the southern tradition to eat greens and peas for prosperity and "good luck." And I ate WAY more of it in one sitting than I should have.  Not because of the "luck" part, but because of the "good" part. ☺

Looking at this picture, I don't think "easy" or "quick" would immediately come to mind, but having already given it a try, I am here to say it was both.  AND I only got one pan dirty!  

This recipe is so up my alley.

Pork Tenderloin and Collards Skillet

printable recipe

4 servings
  • 2 1/2 tbsp unsalted butter, divided
  • 1 lb pork tenderloin, trimmed
  • 3/4 tsp kosher salt, divided
  • 3/4 tsp black pepper, divided
  • 3/4 cup sliced yellow onion
  • 3/4 cup chopped red bell pepper (I used a mix I had in the crisper)
  • 3 garlic cloves, sliced
  • 2 tsp fresh thyme leaves
  • 4 cups thinly sliced stemmed collard greens
  • 1 cup canned unsalted black-eyed peas, rinsed and drained
  • 2 1/2 tbsp apple cider vinegar
1. Heat 1 tbsp butter in a large cast-iron skillet (I actually used my cast iron dutch oven).  Sprinkle pork with 1/2 tsp salt and 1/2 tsp pepper.  Add pork to pan; cook, turning to brown all sides, until a thermometer inserted in the center registers 145 degrees F, about 15 minutes.  Place pork on a cutting board; let stand 10 minutes.  

2. While letting pork rest, melt remaining 1 1/2 tbsp butter in skillet over medium.  Add onion, bell pepper, garlic, and thyme; sauté 3 minutes.  Move onion mixture to one side of the pan; add collard greens to the other side of pan.  Cook 2 minutes.  Add peas and vinegar to greens; cook 1 minute.  Stir together onion and collard mixtures.  Stir in remaining 1/4 tsp salt and remaining 1/4 tsp pepper.  Serve with sliced pork.

Recipe from Cooking Light.

Tips and Tricks

  • For a bit more flavor on the meat, salt and pepper in advance and let sit.
  • To quickly de-stem and rinse collards, hold by stalk, upside-down, over sink (with a few inches of cold water).  Using a sharp knife, place blade at bottom of leaf on one side of stalk, and push knife down towards top of stalk.  Most of leaf should come off. If not, tear off any left.  Repeat with other side.   


Wednesday, December 20, 2017

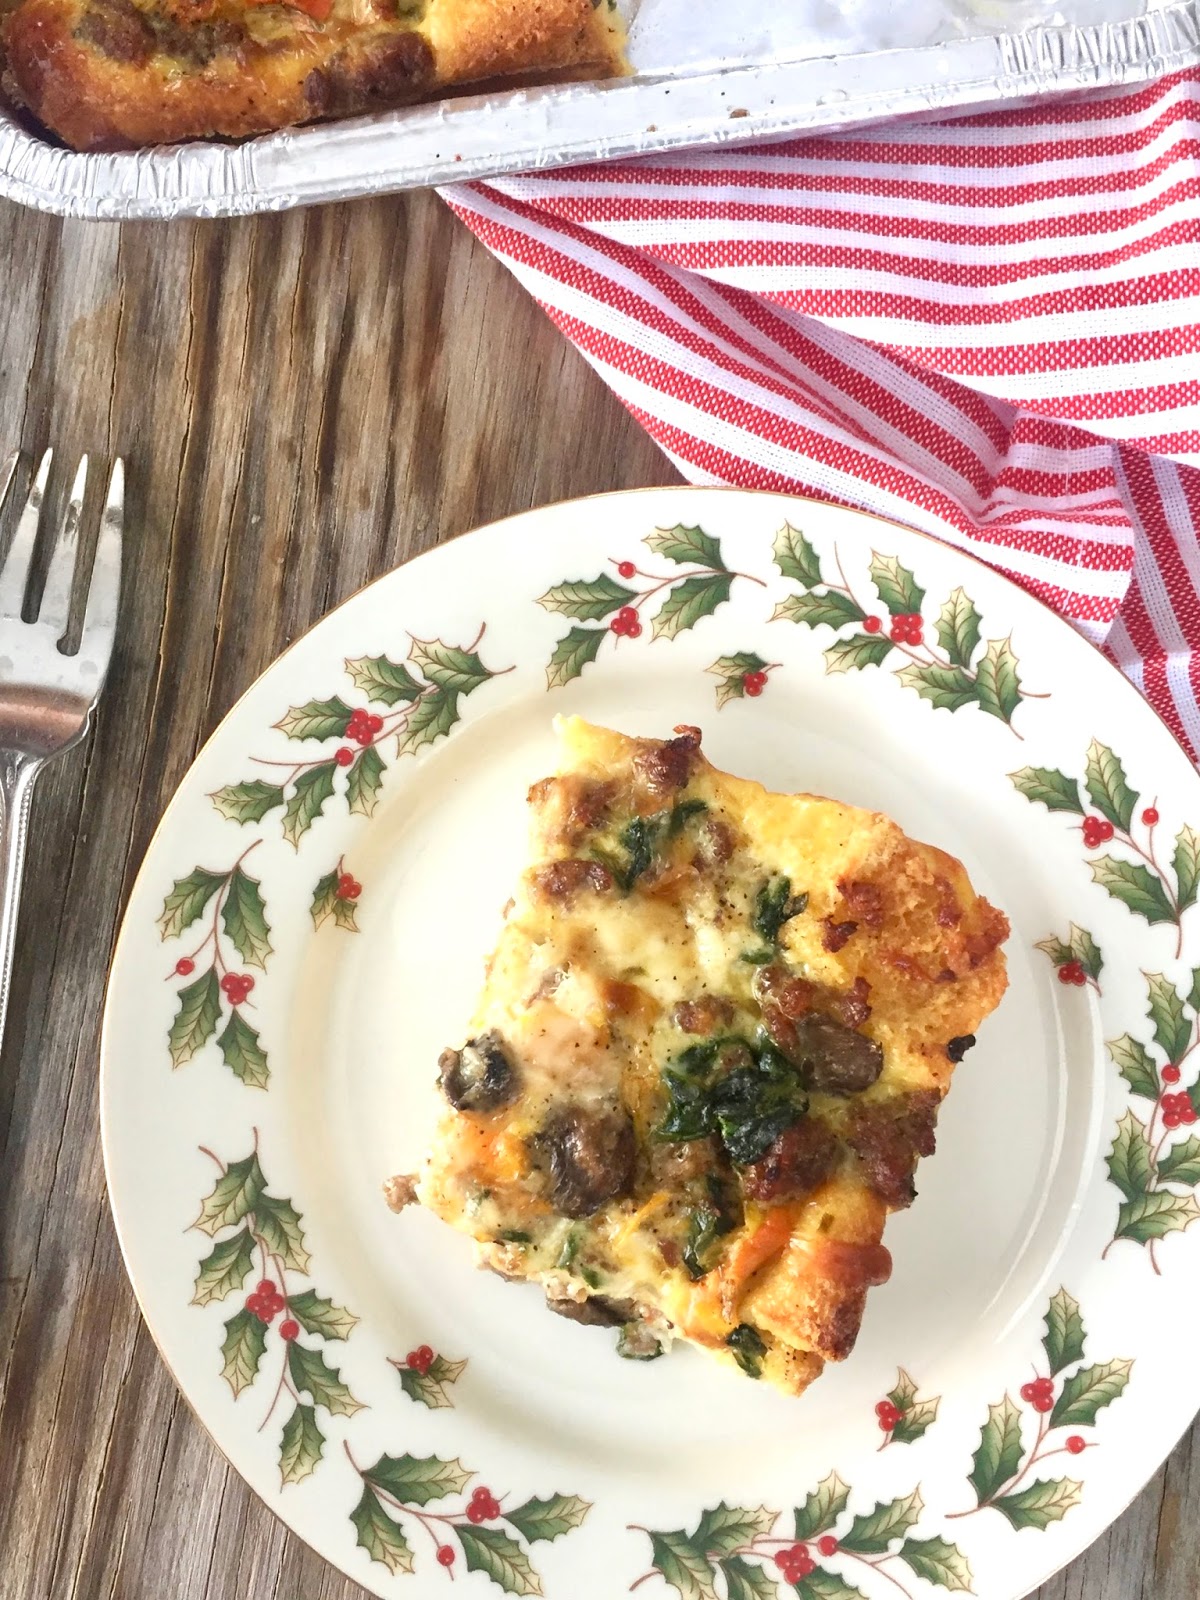
easy make-ahead breakfast casserole


Every year, beginning in October or so, I start thinking about possible Christmas gifts for my friends. I look through endless cookbooks for cookies, breads, or candies, I Google, I invent ideas, and then I finally land on something.  It's a fun process, but I really want the end result to be enjoyed, useful, and - of course - straight from the kitchen.  

This year, I thought about what could be tasty AND helpful, and I came up with the idea of gifting a breakfast casserole.  I had in mind several of the recipients who were hosting their in-laws, their college kids, or just their own immediate families, and I thought it might be neat to have a frozen, ready-to-thaw-and-bake breakfast on hand.  At least it would be one meal taken care of for them. For a few, I paired the casserole with the cinnamon swirl bread from my last post, and for others, I par-baked and froze these cinnamon rolls.  All of them I tied off with a small bag of flavored coffee.  

I have to say this casserole is one of the tastiest I've ever had.  The array of vegetables absolutely makes it and the ability to adjust and customize to one's liking is its best feature!  For the casseroles I gave away, I did a combination of breads for the bottom layer - sourdough, country white, and whole wheat.  For ours here at home, I used this sandwich bread, which I've been using for the last few months as I watch my carb intake.  The bread could easily be left out or replaced with some kind of potato, if desired.  To gift, I made the casserole in an aluminum pan through the last step before baking, wrapped in plastic wrap and then foil, and then froze it completely over night.  I provided the instructions on how to thaw and bake when I delivered the final product.  

If you are needing an idea for breakfast, brunch, or even a dinner over the next couple of weeks, I think you will find this recipe a winner.  You can sub and adjust to your heart's desire... any kind of protein, bread or vegetable, it's your choice!  And I love options, don't you?  But more than anything, I love great flavor.  Bon appetit!  

Easy Make-Ahead Breakfast Casserole

makes one 9x13 or two 8x8 pans

  • 3/4 lb uncooked sausage, casings removed (or meat of choice)
  • 1 tsp dried rosemary (optional)
  • 2 bell peppers, diced ( I used yellow, orange and red)
  • 1/2 medium onion, diced
  • 1 tsp minced garlic
  • 1 cup sliced mushrooms
  • 1 cup fresh spinach
  • salt and fresh ground pepper
  • 4 slices day-old bread of choice, cubed (you can put in 400 degree oven for a few minutes, if needing it quickly)
  • 10 large eggs
  • 1/2 cup milk (I used whole, but any milk will work)
  • 1/2 cup shredded cheese (again, choose your favorite, but I used pepper jack 
1. Cook sausage (and rosemary, if using) until fully browned.

2. Once some fat has been rendered from the sausage, pour a couple of tablespoons in a separate pan and cook the onions and peppers until tender, about 7-10 minutes while sausage finishes cooking.  

3. Add in garlic and mushrooms and cook a couple of minutes before adding spinach.  Cook briefly until spinach just wilts. 

4. Pour vegetables and sausage into large bowl and thoroughly combine, adding salt and pepper to taste.

5. Place bread in bottom of pan/s coated with butter.  

6. Beat eggs, milk and 1/4 cup of the cheese until well blended.  Pour half of the mixture over the layer of bread.

7. Layer the sausage/vegetable mixture over the eggs and pour remaining egg mixture over that.  

8. Finish with the remaining cheese and another sprinkling of salt and pepper.  

9. If freezing, wrap in plastic and then foil and place in the freezer for up to three months.  When ready to use, thaw in fridge overnight, bring to room temperature and cook at 375 degrees for 40-45 minutes, or until good and browned and center is set.

10. If using next day, cover casserole and place in fridge several hours, or overnight.  Bring to room temperature, and cook at 375 degrees for 40-45 minutes, or until good and browned and center is set.

11. Cool for 10 minutes, slice and serve.

Recipe from Sally's Baking Addiction. 


Monday, July 17, 2017

cooking light, cooking right ~ grilled chile-lime flank steak with grilled corn and bell pepper salad


In the last 22 days, we've only been in our own house three.  We have had a whirlwind of a time, with a terrific visit to Indiana, a couple of days in Crossville and the last week at church camp. Although I've loved every minute of our time away, I have really, really missed my kitchen.

I've been wanting to share these recipes with you for weeks.  We cooked this for the first time shortly before we headed out of town, and I fell in love with it!  Rather than firing up the stove, it can all be cooked on the grill, keeping the house cool and dirty dishes to a minimum.  We grilled some Texas toast to complete the meal, and supper was on the table in no time at all.  The best part about it? Flavors were OFF. THE. CHART.  There is no doubt this will be back on the menu!

Call me crazy, but as I type I'm watching the Hallmark Channel and loving every second of their "Christmas in July" lineup.  Currently, a sweet family is decorating Christmas cookies in the kitchen of a snow-covered bed and breakfast.

Eh-hmm... can we say, "Dream come true?"

At any rate, it makes me start thinking about some cookie recipes I've earmarked to try over the next few months.  Maybe I'll give them a trial run sooner than later.  Who cares if we're having record temps and humidity in Nashville?!?  Sweltering heat or not, I know the boys in the house wouldn't mind testing them one bit. 😋

Grilled Chile-Lime Steak with Grilled Corn and Bell Pepper Salad

makes four servings


for the steak
  • 1/2 cup chopped fresh cilantro stems
  • 3 tbsp fresh lime juice
  • 3 tbsp olive oil, divided
  • 3/4 tsp crushed red pepper, divided
  • 1 lb flank or skirt steam, trimmed
  • Cooking spray
  • 1/2 tsp kosher salt
  • 1/4 cup vertically sliced red onion (we left out)
  • 1/4 cup loosely packed fresh cilantro leaves
  • 1 tbsp sliced garlic
  • 4 lime wedges

for the salad
  • Cooking spray
  • 2 large ears fresh yellow corn, husks removed
  • 1 medium red bell pepper
  • 1 medium yellow bell pepper
  • 1 medium shallot, peeled and halved lengthwise (we used a small Vidalia)
  • 3 tbsp chopped fresh flat-leaf parsley
  • 2 tbsp extra-virgin olive oil
  • 1 tbsp apple cider vinegar
  • 1/4 tsp kosher salt
  • 1/4 tsp freshly ground black pepper
  • 3/4 oz Cojita cheese, crumbled (about 3 tbsp)
for the steak

1. Preheat grill to high (450-550 degrees).

2. Place cilantro stems, juice, 1 1/2 tbsp oil, and 1/2 tsp crushed pepper in a mini food processor; process until smooth.  Place cilantro mixture in a shallow dish; add steak, turning to coat.  Let stand 10 minutes.

3. Coat grill grate with cooking spray.  Remove steak from marinade; discard marinade.  Sprinkle steak with salt.  Add steak to grill; cook 4 minutes on each side for medium-rare or until desired degree of doneness.  Place steak on a cutting board.  Let stand 5 minutes.  Cut across the grain into thin slices.

4. Place steak on a platter; sprinkle with remaining 1/4 tsp crushed pepper, onion (if using), cilantro leaves, and garlic.  Drizzle with remaining 1 1/2 tbsp oil.  Serve steak with lime wedges.

for the salad 

1. Preheat grill to high (450-550 degrees).

2. Coat grill grate and corn, bell peppers, and shallot (or Vidalia) with cooking spray.  Add vegetables to grill.  Cook corn 14 minutes, turning after 7.  Cook bell peppers 10 minutes, turning occasionally.  Cook shallot/onion 8 minutes, turning after 4 minutes.  Remove vegetables from grill; cool 5 minutes.

3. Cut corn kernels from ears and place in a bowl.  Cut bell peppers into 3/4-inch pieces; add to corn.  Chop shallot/onion; add to corn mixture.  Add parsley, oil, vinegar, salt, and pepper to corn mixture; toss.  Sprinkle with cheese.

Recipe from Cooking Light.


Saturday, March 25, 2017

SUPER-EASY pulled pork loin over hoe cakes


It has been a really great week of eating.  We were gone all last week for Spring Break visiting family in Indiana, and when we take those trips, I always take the stack of magazines I've saved to read.  I watch Create TV, of which I have fallen in love, and I surf the internet more than ever.  I prepare and plan meals the way I wish I always did, and it makes for such a smooth week when we return.  Grilled burgers and romaine, fish tostadas with cilantro lime crema, roasted salmon with lemon butter...  Good, good and good.

I'm in the middle of planning for this coming week and am thinking of using one of the greatest gifts given to working moms - the crockpot.  It's a lifesaver and a planner's - or, in my case, a wannabe planner's - dream.  If you have a hunk of meat and any spices at all, you can usually pull something together and make it great.

Enter this recipe.

Once upon a time, there was a pork loin roast hanging out in my freezer, and the rest is history.  It comes out tender, juicy, wonderfully good, and you can use the results for just about anything. As you can see here, I just added some more BBQ sauce and spooned over Paula Deen's Hoe Cakes. Southern goodness.  Almost zero work.  Sounds like a plan to me!

Pulled Pork Loin in Crock Pot

makes about three pounds of meet

  • 3 pound pork loin
  • 8 ounces of BBQ sauce of choice
  • 1 small onion minced (I grated mine - quick and easy to incorporate)
  • 2-3 garlic cloves minced
  • hot sauce as desired
  • salt and pepper 
1. If you have time, salt and pepper the pork loin and let sit for at least an hour.  If not, just do right before using.

2. Mix remaining ingredients in a bowl and pour over loin.

3. Cook on low 6-7 hours.  

* Towards the end, I did give the meat a good stir and left off the lid to cook off some of the liquid, although you don't have to.  You can drain.  At this point, the meat is not overly BBQ-y.  That's what makes this a flexible dish.  I did add more sauce, as we were wanting a BBQ meal.  And extra sauce is definitely a must for the following hoe cakes to taste their best!

Paula Deen's Hoe Cakes

makes about 15-17 cakes

  • 1 cup self-rising flour
  • 1 cup self-rising cornmeal or mix (Aunt Jemima recommended)
  • 2 eggs
  • 1 tbsp sugar
  • 3/4 cup buttermilk
  • 1/3 cup plus 1 tbsp water
  • 1/4 cup vegetable oil or BACON GREASE (can you tell which one I prefer?)
  • Oil or butter for frying
1. Mix all the ingredients except for the frying oil.  Heat that oil in a medium or large skillet (a griddle or cast iron skillet is my preference) over medium heat.

2. Drop the batter by tablespoons (two per cake) onto the hot skillet.  Fry until brown and crisp and then turn to do the other side.  

3. Remove cooked cakes with slotted spoon and drain on paper towels.  Will keep in fridge for two days.


Monday, July 25, 2016

cooking light cooking right ~ fish tacos with cabbage slaw


I love Sundays, because we adore our church family.  But sometimes we adore them for so long after church is over, we're rushing like crazy to get home and eat.  On top of that, yesterday, we had to run to the grocery store.  Why we do that to ourselves, I'll never know.  It truly tries every ounce of patience I have and is a really wonderful way to self-reflect on that which the preacher's message has challenged me earlier in the morning.  

Love others.  Do not be easily angered.  Practice patience.  

You know, those things that are oh-so-easy to do at Wal-Mart when the crowd could fill twenty check-out lines but only three are open (insert sarcastic expression here).  

At any rate, after collecting a handful of groceries, getting stuck in the mega-church's dismissal traffic one mile from our house, unloading our car and putting away everything, I was so seriously excited to eat this meal, I only snapped about two pictures and called the family to the table.  It was ~ no joke ~ one of the best meals at home we've had.  Not because it was fancy or difficult, gourmet or laborious.  This meal was fresh and clean and just plain good.  Exactly what I have come to expect from Cooking Light's recipes.  

If you want a quick meal with even quicker clean-up, put a big ol' platter of the fish and fixin's out on the table, distribute the paper plates, and completely and totally chow down.   Oh, and do a side of black beans with a little salt and cumin, because that, my friends, is what you call Sunday lunch.

Fish Tacos with Cabbage Slaw

serves 4-6


For the tacos
  • 6-8 tilapia frozen fillets, thawed
  • chili powder
  • kosher salt
  • 1 tbsp oil
  • 8 corn tortillas
For the slaw
  • 12-oz bag shredded cabbage (or slaw mixture)
  • 1/2 cup diced roma tomatoes
  • 1/3 cup chopped cilantro
  • 1/3 cup sliced green onions
  • 2 tbsp fresh lime juice
  • 2 tbsp olive oil
  • salt and pepper to taste
  • malt vinegar to taste
To garnish
  • 2 avocados, diced
  • 2 limes, quartered
1. Combine all slaw ingredients and mix.  Set aside.

2. Heat oil in large skillet.  Meanwhile, sprinkle fillets evenly with chili powder and salt.  

3. In hot skillet, cook fillets until they flake easily, about 2-3 minutes per side.  Remove and cover with foil to keep warm.

4. Heat second skillet (I love my cast iron for this) and slightly blister the tortillas on each side.  Place with fish to keep warm until all are heated.

5. Fill platter with cooked fillets, slaw, avocado and lime quarters.  Build tacos to your liking and enjoy!

Recipes for slaw and fish inspired by Cooking Light.


Wednesday, July 20, 2016

pan seared scallops with sesame sauce


It has been quite a minute since I've been on here, has it not?  It's actually a little scary to think it's been nearly four months since my last post but feels like yesterday.  I remember being a young adult and having older adults warn me how fast life will go, the older I get.  They were not joking one. single. tiny. bit.  

I have been in my kitchen some this summer, but not much at all.  We have traveled pretty regularly, leaving out on our first trip the day after school got out (you can read about our mission trip here) and getting back from our fourth this past weekend.  In the middle of those was a jaunt up north to Indiana.  

When we visit family, you can bet we'll have a cooler, along with a bag or two, of groceries sent home with us.  It's just how family is, and this last trip was no different.  Within the load of groceries were a bag of bay scallops and box of Asian noodles (Shan Dong, to be exact).  So I set out on a search for an easy recipe to combine those two ingredients, imagining something a little sweet, savory and spicy would work nicely.  

We really, really enjoyed this dish and I LOVED the short prep time.  I believe it took me about 20 minutes from start to finish.  Super-big flavor in minutes flat?  Ladies and gentleman, we have ourselves a winner.

Pan Seared Scallops with Sesame Sauce

makes four servings
printable recipe

  • 8 oz Asian noodles
  • 1/4 cup reduced-sodium soy sauce
  • 3 cloves garlic, minced
  • 1 tbsp rice vinegar
  • 1 tbsp sugar
  • 2 tsp sesame oil
  • 1 tsp cornstarch
  • 1/4 tsp crushed red pepper flakes
  • 1 tbsp olive or vegetable oil
  • 1 1/2 pounds scallops (I used small bay scallops)
  • 1/4 cup scallions, chopped
1.  Cook noodles according to package directions.

2.  While noodles cook, in a small bowl, whisk together soy sauce, garlic, vinegar, sugar, sesame oil, cornstarch and red pepper flakes.  Set aside.

3. Heat oil in a large skillet over medium heat.  Add scallops and cook until golden.  Turn with spatula and continue to cook until second side is golden.  Add soy sauce mixture to pan and bring to simmer, about two minutes, until sauce thickens and scallops are cooked through and have an opaque color.

4.  Serve scallops over noodles, toss, and top with scallions.


Recipe from Robin Miller, by way of foodnetwork.com.  


Friday, November 6, 2015

slow cooker star - momma's italian beef


A friend and I were talking a while back about the luxury of eating a meal with our family at home and how a home-cooked meal is more of a rarity than commonplace.  In fact, she said her son made a comment one night around the dinner table to the effect of, "Wow!  Eating healthy is so good, Mom!"  She said it struck her kind of funny as she looked at their main course of Poppy Seed Chicken spread across the table.  Soul food?  You bet.  Healthy?  Not so sure.  But in his eyes, "eating healthy" meant just eating something that came from the fridge or oven in his very own house.

Can't you relate?  I know we can, all too well.  Two full-time working parents, active church involvement, multiple children with homework and extra-curricular activities...  A from-scratch meal by dinner time?

Whatever.

EXCEPT when one has a recipe like this one.  Seriously.  If I can't make time to throw this together, which yields a fantastic hearty and delicious meal, I might add, then I need to pack it up and go home.  Home, I tell ya.

Italian Beef is one of my favorite dishes that Mom fixes, and I just don't think about it until I walk into my parents' house, and the aroma meets me at the door.  I love it, and Mom knows that, and so this last trip I made up north, she had it waiting on me.  What a gift.  I knew after eating it that night, I was going to make a conscientious effort to make it myself, so I could share it with you.

And just hold onto your hats, as I tell you about this recipe:

Four ingredients, NO prep work, and 18 hours in the crockpot -  EIGHTEEN.  Full-time working moms everywhere... this is your BFF.  No joke.

Serve this up with Lays potato chips and a green salad or cold pasta dish... I'm telling you, coming home at the end of a long day never tasted so good.

Momma's Italian Beef

1 five-pound rump roast
2 cans (10 1/4 oz) beef consomme
1 package Good Seasonings Italian salad dressing mix
1/2-1 jar (16 oz) pepperoncini peppers (depending on the spiciness you prefer)

1.  Place ingredients in slow cooker and cook on low for 18 hours.  Half-way through, turn meat inside pot.

If desired, serve on hoagie rolls and top with sauteed peppers, onions, and favorite white cheese.  And don't forget an extra drizzle of juice!

Other ways to enjoy...

* Take to a potluck with thin provolone cheese slices.  Place the cheese on the roll and top with hot beef to melt the cheese.

* To the roll, add a delicious slather of a little mayo and dried Italian seasoning herbs mixed together.

* Place a slice of your favorite cheese over the meat and pop under a broiler.  Watch closely for slight browning and remove.  Perfectly toasted.  Beautifully melted.


Monday, April 8, 2013

cooking light, cooking right - thai shrimp cakes


I've never been a big diet person.  I don't like them at all, actually.  They're restrictive, they're trendy, and they're not fun.  Three things I don't think I am.  

I've always been fortunate to have a pretty healthy palate, which has definitely played in my favor, and somehow... for the most part... I've been able to balance a love of all the things one shouldn't eat too much of, with a sincere appreciation for most things one should.  


Out of all the cooking magazines I have historically, and currently do, subscribe to, Cooking Light ranks at the top of my list.  So, I thought it might be fun to have a reoccurring post to feature some of my favorite CL recipes.  I've titled it, Cooking Light, Cooking Right.  

The magazine has a great mix of quick recipes, edgy recipes, down-home recipes, and just plain good recipes with a lighter twist.  It's not a wipe-all-the-sugar-and-fat-out-of-a-recipe type magazine, but it is an everything-in-moderation kind of offering that gives a rather pleasant - but not in your face - nod towards healthy food decisions.  Best of all, it never sacrifices flavor for a few less calories!

Everywhere I look, I'm seeing Asian recipes.  It seems to have the covers and headlines of many food discussions, so I thought I'd try my hand at one I found in the latest edition of the magazine.  These cakes came together so incredibly fast, and John said - I quote - "This might have been the most flavorful thing I've eaten!"  

I couldn't have agreed more.

I followed this recipe to a "T" and didn't, nor wouldn't, change a thing.  Well, actually, you could add a bit more olive oil than called for, just so the cakes have enough for a quick seer/fry to help hold them together.  Don't be afraid to let them sizzle for a while.  You want to be able to successfully flip them.

I'm not sure what it is about these, specifically, that causes the immense flavor.  The ingredients fit together beautifully, and all I know is I already want more.  That's if I can beat John to the platter.  I was glad I had eaten one before I let him at 'em.  I'm still looking forward to a second.

A side of steamed Edamame with a nice sprinkling of Kosher salt made this meal on the patio at sunset a "10."  Thanks, Cooking Light.  With recipes like this, it's "cooking right" in my book!    


Thai Shrimp Cakes - makes 4 cakes
Ingredients:
  • 2/3 cup panko (Japanese breadcrumbs), divided
  • 1/4 cup minced unsweetened dried coconut, divided
  • 2 tbsp. minced green onions
  • 2 tbsp. finely chopped fresh cilantro
  • 2 tsp. fish sauce
  • 2 tsp. Sriracha (hot chile sauce)
  • 1 1/2 tsp. grated peeled fresh ginger
  • 1 tsp. lime juice
  • 1 large egg, lightly beaten
  • 1 garlic clove, minced
  • 8 ounces peeled and deveined shrimp, chopped
  • 1 tbsp. olive oil (or more, if needed)
  • 1 lime, quartered
~ Combine 1/3 cup panko, 2 tbsp coconut, and next 8 ingredients in a large bowl.  
~ Add shrimp and stir just until combined.
~ Using wet hands, shape mixture into 4 equal balls.
~ Combine remaining panko and coconut in a shallow dish.
~ Coat balls in panko mixture, pressing to form 4 (4-inch) patties.
~ Heat a large nonstick skillet over medium-high heat.
~ Add oil; swirl to coat.
~ Add patties; cook 4 minutes on each side or until desired degree of doneness.
~ Serve with lime wedges.

Recipe from Cooking Light


Monday, March 25, 2013

spanish spaghetti bake


Can I just tell you how much I love it when things come together just right?  Especially when you're flying by the seat of your pants?

Saturday, I went on what felt like a marathon grocery shopping run.  We had been gone a week to visit family for Spring Break, so there was a lot of catching up to do in the fridge.  I promise there was a plan for supper when I returned from the store, but how many of you have experienced the following?  
  • You're gone shopping for what seems like forever.  
  • You unload like 15 bags of groceries.  
  • The 15 bags suddenly are staring back at you from the kitchen floor looking as though they've multiplied by three and still have to be put away.  
  • Oh, and it's nearing 6:00 PM. 
  • Did I mention everyone's starving? 
Ugh.  Are you with me here?

I just couldn't wrap my head around whipping up anything too involved.

And so I brainstormed this concoction.  Seriously, folks.  In a matter of 45 minutes, we had supper.  And I think a pretty good one.  John had three helpings.  Daniel gave great feedback, licking the bottom of the dish.  And what about Luke, you ask?  Well... in perfect Luke fashion, he was very happy with the PBJ he whipped up for himself.  

Hey, listen.  If I have approval from two of the three, the rest is gravy.

When you look at the ingredient list, you will find this is really a healthy and hearty dish.  I do need to say, though, I rarely, rarely use cheese "food."  

And what is that anyway?  Actually, never mind.  It's probably best we don't know.  

At any rate, this whole recipe came about as I was in a bit of a panic of what to do fast and remembered I had some left in the fridge that needed to be used.  I'm sure you could use the real deal when making this, if you'd like to feel better about the ingredients.  That's unless your grocery store is as fickle as ours about consistently carrying the real queso.  I couldn't get it for the life of me a couple of weeks ago when the boys were begging for the "Mexican restaurant cheese" to go with their nacho chips, so Velveeta was it.

I'm looking forward to doing this one again soon.  There was a ton of flavor and couldn't have been easier.  What a fantastic dish to prepare for company too!  I'm so glad my Saturday went the way it did.  No joke.  I have this flying-by-the-seat-of-my-pants thing down pat!

Spanish Spaghetti Bake - makes one 9x13 dish
Ingredients:
  • 1 1/2 pounds ground beef (or shredded chicken), cooked
  • 3 cups of your favorite prepared salsa
  • 2 tbsp. taco seasoning (my preferred recipe below)
  • 2 tbsp. chopped cilantro (plus more for garnish)
  • 1 pound spaghetti noodles, cooked (we mixed whole wheat and plain)
  • 12 ounces queso cheese
  • pickled jalapeño slices, optional
~ Preheat oven to 350 degrees.
~ Spray one 9x13 casserole dish with non-stick cooking spray.  Set aside.
~ Mix together cooked meat, salsa, taco seasoning, and cilantro.
~ Spread about 3/4 cup of sauce on the bottom of the dish.
~ Layer noodles, sauce, and cheese.  Repeat.  I save a little more than half of the cheese for 
    the top layer, so there's plenty to cover.
~ Cover the dish with foil, being careful to tent the foil to keep it from sticking to the 
    cheese as it heats.  Cook for 25-30 minutes.
~ Remove foil and turn oven to broil.  Watch closely for cheese to fully melt.  When it 
    begins to blister, remove and let cool for five minutes before serving. 
~ Garnish with snipped cilantro and jalapeño slices, if preferred.

Homemade Taco Seasoning
Ingredients:
  • 1 tsp. sea salt
  • 1 tsp. pepper
  • 1 tbsp. chili powder
  • 1/4 tsp. garlic powder
  • 1/4 tsp. onion powder
  • 1/4 tsp. crushed red pepper
  • 1/4 tsp. oregano
  • 1/2 tsp. paprika
  • 1 1/2 tsp. ground cumin
~ Mix all ingredients.

Spaghetti recipe from The Lazy Daisy Kitchen.  Taco seasoning recipe from All Recipes.


Thursday, March 21, 2013

lemon rosemary spatchcock chicken - a lazy daisy favorite


Several years ago, I was watching Oprah when I learned of this dish.  I wasn't a regular viewer of her show, but I never wanted to miss an episode if she was featuring anything regarding food or cooking.  

That afternoon in 2006 I fell in love with Nigella Lawson.  

Nigella was beautiful to look at, listen to, and just... well... normal.  She had a flair for refined food done simply.  So simply, by the episode's end, she had me believing I could whip up a gourmet meal with no trouble.

And I did. 

I have no idea if what I do today with this chicken recipe is exactly what Nigella suggested then, but I remember she was very loose with her instructions and seemed to celebrate personal taste and judgment.  The following is what always works for me, but I too encourage you to try what you desire.

In my opinion, this combination can't get any better.  It is a blend of all of my favorites, roasted to perfection, leaving a juicy meat on the inside and crisp, rich, flavorful skin on the outside.  And have I mentioned how frugal this is as well?  Who said fancy food has to be expensive?  Look for whole chickens to go on sale, buy them, and freeze.  

Now that I've given you all the reasons to try this, I do want to level with you regarding the spatchcock method.  It's kind of icky.  When I first tried my hand at it, I have to admit it was a bit exciting.  I guess for me, in all my weird love of cooking adventures, I found it kind of fun.  But I totally understand if it might gross you out.  To save you from some of the goriness, I put the actual pictures on how to butterfly the bird in black-and-white.  I figured we didn't need all the details.  

To those of you who give this a go... I applaud you!  You'll love the outcome and will feel so accomplished once you deliver the dish to the table!  Expect some "o-o-o-h-s" and "a-h-h-h-s" from your guests or family.  It's a beauty! 

So, dear friends, here we go.  Get your paper towels handy, your antibacterial soap ready, and your kitchen shears sharpened - this is gonna be fun!  

How to Butterfly (or spatchcock) a Chicken 
  
1.) After removing all items from the cavity of the bird, rinsing, and drying it,  place chicken, breast-side down, on flat surface.  To the right of the backbone (just right of center), use kitchen shears to cut all the way through to the opposite end.

2.) Do the same to the left of the backbone to completely remove the bone.  Save for stock, if desired.

3.) Spread chicken, cut-side down, and flatten with palm of hand.  

Congratulations!  You just did the hardest part!  Pat yourself on the back... um... after washing your hands, of course. 

Spatchcock Chicken - makes one 3-4 lb. bird
Ingredients:  
  • 1 3-4 lb. chicken, cleaned and butterflied
  • 2-3 tbsp. Kosher salt
  • 6 tbsp. olive oil
  • 1 medium onion, sliced (I use sweet)
  • 3 sprigs fresh rosemary
  •  2 cloves garlic, smashed
  • 1 lemon, halved
  • 1 large Ziploc bag (gallon will usually work, but it's hard to squish the whole bird inside; extra-large ones work great)
~ On flat surface, spread out chicken and sprinkle all sides with salt evenly.
~ Place chicken in bag and add oil, onion, garlic.
~ Strip waxy leaves of rosemary from the stalks and add all to the bag.  
~ Squeeze juice of lemon halves into bag and put the halves in the bag as well.
~ Close the bag, squeezing out as much air as possible.  Thoroughly squish ingredients in
    bag around chicken and let marinate at least one day and up to two, squishing bag 
    periodically.
~ When ready to cook, remove bag from fridge and bring to room temperature.  
~ Heat oven to 425 degrees.
~ Place chicken cut-side down on foil-lined pan and cook at least 45 minutes or desired 
    doneness*. 

Recipe inspired by Nigella Lawson

For safety purposes, the USDA suggests poultry should reach an internal temperature of 165 degrees F. 


Monday, March 11, 2013

love people; cook them tasty down-home poppy seed chicken casserole


"And if you give even a cup of cold water to one of the least of my followers, you will surely be rewarded."  Matthew 10:42
Yesterday was just a wonderful day of worship and digging deeper into finding out what it is God desires of us.  At Una, we've been spending Sundays in the book of James… so practical and real.  For me, it's always been the "when-the-rubber-meets-the-road" kind of book.  And I can't help but think about its author, James… the very brother of Jesus himself.  He had to have a really remarkable perspective!

But as wonderful as yesterday was, it was as much - and possibly even more - unsettling to me.  Because yesterday's sermon, and discussion following, centered around our riches… our attitude about them, how we attain them, how we spend them, and how we can choose to either store away for our idea of a perfect life later or give them away and bless others.  Big responsibility. 

Although anyone who is able to read this is more than likely richer than 90% of the rest of the world, I know there are many who would say their pockets are not always full enough to offer monetary handouts easily.  But for those in such situations, I urge you to remember that you too can bless others.  And if you've been reading this blog long enough, you know I'm passionate about doing so through food.  It speaks to the heart, offers relief, lifts the spirit!

This recipe is one of those down-home, no pretenses, let-me-help-you-feel-better kind of recipes.  It can make a little or a lot and pleases children and adults alike.  That alone, in my book, makes this a keeper!

To this whole idea of blessing others through food, I have a "big idea" spinning around in my head that I hope to solidify and share in weeks to come.  In the meantime, if you're so inclined, be sharing the blog with others.  It's an easy way to help me spread the word about the big idea when the time is right.

To a God-blessed week!  Cheers!

Down-Home Poppy Seed Chicken -  makes 6-8 servings
Ingredients:
  • 3 lbs. chicken, cooked and cubed
  • 1 tsp. kosher salt, optional
  • 1 recipe of Cream of Whatever soup (I use a mixture of celery, mushroom, and chicken to make 1/2 cup of the main ingredient for this dish)
  • 3/4 cup sour cream
  • 1/2 cup milk
  • 1 1/2 sleeves Roasted Vegetable Ritz Crackers
  • 1/2 cup melted butter
  • 1 1/2 tbsp. poppy seed
~ Heat oven to 350 degrees.
~ While preparing cream soup, sprinkle cubed chicken evenly with salt, if desired.  Set 
    aside.
~ Mix together soup, sour cream, and milk.  Add chicken and stir.
~ Place crackers in a plastic bag and crush using the bottom of a glass, hands, etc.  I find a 
    rolling pin works great!
~ Add poppy seed and melted butter to the crushed crackers.  Shake bag to mix until butter 
    is evenly distributed.  
~ Add HALF of the cracker mixture to the chicken mixture and stir.
~ Pour into greased 2 quart casserole dish and bake for 30 minutes.
~ Remove from the oven and add the last of the crackers on top.  Bake for another 15-20 
    minutes or until bubbling.

Recipe from The Lazy Daisy Kitchen


Saturday, March 2, 2013

SOUPer saturdays - crockpot four bean soup


Daniel had a project at school a couple of weeks ago.  He was asked to show in a creative way the layers of the earth.  He decided to use different varieties of beans to get the job done.  And as we stood in the aisle of the grocery store, I have to admit I was making suggestions based on what I thought would make a great recipe for the after-project party (a.k.a. supper).

So what used to be in this...


...ended up like this.  Aren't they beautiful?


I've always liked beans in any number of forms.  They're extremely versatile, filling, economical, and healthy.  But in a more traditional dry bean recipe, they can also be time-consuming.  The whole soaking process and simmering-for-hours thing...  well, I love it on a day when I can just hang around the house for a while, but it's not very practical during the week.  So, I decided to give a try with the crockpot and see what kind of time and effort it would save, hoping it would also result in an acceptable dish.  I was not disappointed.

This recipe makes a rich, thick bowl of beans, that topped with Ma's Cornbread (recipe coming) and accompanied by a glass of sweet tea, could make any true southerner swoon. 

Today, in Nashville, there's a beautiful smattering of snowflakes floating, and in our home, a fire burning.  It's the kind of day that calls for a recipe such as this.  Be warm and filled!

Happy Saturday!

Crockpot Four Bean Soup - makes a ton
Ingredients:
  • four cups of dried beans of choice, rinsed (used here are red kidneys, lentils, split peas, and black beans)
  • 1 medium onion, diced
  • 2 cloves of garlic, minced
  • 1 can (28 oz.) diced tomatoes (San Marzano fire-roasted are fabulous for this)
  • 2-3 tbsp. steak seasoning of choice (adjust to your taste)
  • 2 sprigs of thyme
  • 2 sprigs of oregano
  • 1/4 tsp. crushed red pepper (optional)
  • water to cover the beans and fill crock to about two inches from top
  • salt and pepper to taste
~ Stir all ingredients together, minus salt and pepper, and cook on low all day. 
~ Add salt and pepper to taste at the end until desired taste is achieved.


Recipe adapted from Stephanie O'Dea
-


Tuesday, February 19, 2013

good morning! breakfast burritos


Mornings.  I really do like them.  

I think it's because I've always been afraid I'm going to miss out on something if I ly around too long. In fact, when I'd want to have sleepovers growing up, Mom would only agree to it if I would pinky-swear promise that I wouldn't wake up my guests at the crack of dawn.  I was always so eager to see what the day had in store, it never dawned on me my friends wouldn't feel likewise.  So... I would begrudgingly stick to my promise.  But with every ounce of my being, I'd lay there thinking, "What a waste... sigh...".  


Now I'm nearly 38 with two school-aged children and having to get up at the crack of dawn.  My, how that changes one's perspective.

Actually, I'm still good with early rising, but I just can't get up quite early enough to get in everything I want to.  The alarm goes off some days at 4:45 and some days at 5:00, depending on the state of my hair the night before (short hair would be so much easier!).  To get myself ready, the boys all together, pack lunches, and prepare breakfast, it's all we can do to get out by our goal launch time of 6:40 without scratching each other's eyes out (not really... but those of you who are in the same boat know exactly what I'm talking about).  Thankfully, John is a huge help... huge.  

Needless to say, breakfast can be trying.  Because of our somewhat lengthy drive to school, we need to have options that are car-worthy.  

(Speaking of that, did you know one of the biggest indicators of child neglect is eating breakfast in the car?  Yep.  I read the article right after going back to work full time.  I've almost let go of that guilt.)

I have been mulling around a protein-centered grab-and-go idea for a while now, and it finally came together.  Within about 15 minutes on Saturday morning, I had six Good Morning! Breakfast Burritos made; four prepared and wrapped for the freezer, two we ate right away.  Cheap, healthy, flavorful, and fast.  


So... yesterday morning... Monday morning...  the mother of all mornings... I tested one.  I'll have you know:  requiring less than two minutes in the microwave, tasting as fresh as the day I made it, I was eating one successfully in the car by 6:42, and rocking out to Mandisa's, "Good Morning," with the boys.  And you know what?  We all still had our eyes.

Bingo.


Good Morning Breakfast Burritos - makes 6 
Ingredients:
  • 2 tbsp. olive oil, divided
  • 1/2 cup frozen diced veggie mix
  • 6 whole eggs
  • Splash of milk
  • 1/2 tsp. salt
  • 1/4 tsp. pepper
  • 1/2 cup cheese of choice
  • 6 flour tortillas of choice (pictured are soft low-carb, high fiber)
  • 2 tbsp. salsa
  • 2 tbsp. scallions, sliced (if desired)
~ Heat 1 tbsp. olive oil in large non-stick pan until shimmering.  
~ Add veggies and sauté until softened, 5-7 minutes.
~ Remove veggies and place in a bowl.  Set aside.
~ Beat eggs in medium bowl along with milk and salt and pepper.
~ Wipe out pan and heat remaining olive oil until shimmering.
~ Pour beaten eggs into pan and continue scrambling until cooked through.
~ Add in cooked veggies and cheese, incorporating everything until veggies are heated and 
    cheese is melted.
~ Spread out tortilla in front of you.  Spoon 1/4 cup egg mixture evenly onto each tortilla's 
    edge closest to you.  Divide salsa evenly on top of the mixture or save to garnish if not 
    freezing.
~ As you roll the tortilla and filling away from you, fold in side edges and continue to roll 
    until closed. 
~ If freezing, wrap tightly in aluminum foil and freeze.  If serving, place on plates and 
    garnish with salsa and sliced scallions.

Recipe from the Lazy Daisy Kitchen.


Thursday, January 24, 2013

love people; cook them tasty chicken pot pie


I do believe that some of the best food I ever put in my mouth was that which was brought to me after having my babies.  I don't know if it was because my taste buds (along with the rest of me) was in a state of hypersensitivity, or because the food was prepared by someone else, or maybe my serious sleep deprivation played a part.  No matter the cause, with both boys, the post-delivery meals were wonderful!

This Chicken Pot Pie recipe is one I have carried with me ever since.  I doubt you'll find anything terribly surprising in the ingredient list, but I contend the fresh thyme is what takes it over the top.  I just love it in this dish!  It's also particularly good if you have a little extra time and want to make the soups from scratch rather than using the canned... I'll share that in a future post.

If you're not using a deep dish pie pan, you can get two traditional-sized pies out of this recipe, which makes it incredibly easy to bless someone all while preparing supper for your own family.

I encourage you to think of a new mom who probably hasn't had a break since she came home with her newest bundle.  Maybe think of one who's even a couple of months into the journey and is just now realizing she may never get all ten of her fingernails painted ever again, or even one leg shaved, let alone two. Because those of us who've been there know our babies need us when they need us.  Period.  

Maybe you're needed at this very moment.  Grab a few items this week on your grocery run and go bless someone... goodness knows her "hypersensitive everythings" will thank you!


Chicken Pot Pie - makes two pies
Ingredients:
  • 2 recipes/packages of your favorite double pie crust
  • 1 10 oz box/bag of frozen vegetables, prepared according to package directions
  • 1 can condensed cream of chicken soup
  • 1 can condensed cream of potato soup
  • 2-3 cups chopped, cooked chicken (the fresh rotisserie chickens work great… LOTS of flavor)
  • 1-2 tbsp. fresh thyme (adjust to your preference)
  • 1 tsp. salt
  • 1 tsp. pepper
  • 1/4 cup milk
  • 1 egg yolk
  • water

    ~ Heat oven to 375 degrees.

    ~ Place one pie crust in the bottom of each greased 9-inch pie pan and form up sides.  
        Set aside.
    ~ Mix together veggies, soups, chicken, thyme, salt, pepper, and milk.
    ~ Divide mixture between two pans evenly, and cover the tops of both pies with 
        remaining crusts.
    ~ Trim excess crust edges with kitchen scissors and press tines of fork on the edges
        around the pies to seal.
    ~ Cut slits in top of crusts to allow steam to escape as they cook.
    ~ Place pies on foil-lined baking sheet (to catch any overflow... learned the hard way)
        and cook until golden and beginning to bubble, about 45 minutes.
    ~ Prepare egg wash by beating egg yolk with a little water... just a splash.
    ~ Remove pies and brush tops with egg wash.  Cook an additional 10 minutes until a 
        deeper golden and sauce is beginning to emerge.